
The Government of India has officially Rollout Farmer ID creation process, by whom one can get all agricultural benefits directly from the government.
If you are looking for how to create the Farmer ID through AgriStack, I will help you. The step-by-step guide for Farmer ID Registration through AgriStack will help you to create the ID easily, so let’s get started.
What Is Farmer Registration and Farmer ID in AgriStack?
AgriStack is the Government of India’s digital platform for agriculture. One of its main parts is the Farmer Registry, a list of farmers in every state, built by the state governments on common standards.
When a farmer completes the registration process and the application is approved, the farmer gets a Farmer ID through SMS.
You have to keep in mind there are two things; don’t mix it, one is the Enrolment ID, which is given right after you finish registration. You use it to track your application, and the other is the Farmer ID it is issued after the designated authorities approve your application.
Key Highlights
| Detail | Information |
| Scheme Name | Farmer Registry (Farmer ID) under AgriStack |
| Launching Authority | Ministry of Agriculture and Farmers Welfare, Government of India, with State Agriculture and Revenue Departments |
| Beneficiary Category | Farmers (landowning farmers shown in the official operator guide) |
| State/Central Government | Central initiative implemented by each State/UT |
| Benefits | One digital identity for schemes, less paperwork, faster benefit delivery |
| Application Mode | Online (web and mobile app), with assisted registration through operators and camps |
| Official Website | https://agristack.gov.in (state portals such as https://wbfr.agristack.gov.in/farmer-registry-wb/) https://pmkisan.gov.in/ |
Objectives of the Farmer Registry
The main motive is to solve old problems Like: repeated document submission, duplicate or fake records, and delays in subsidies.
- Give every farmer one unique ID, a nationwide digital identity for every farmer.
- Gather farmer details and land details to check scheme eligibility on one digital platform.
- Help governments identify the right beneficiaries and plan agriculture better.
- Provide Direct subsidy to the farmer.
Benefits of Having a Farmer ID
Easier access to schemes. If you have a farmer ID, you can sell your fresh crops directly to the government and take the payment easily.
Less paperwork. Your Aadhaar-based identity and verified land details are already in the system; the government will fetch your data directly from the system, no need to do paperwork, everything will happen digitally.
Faster and more transparent benefits. When your records are verified, benefit transfers, crop insurance, mechanical equipment purchase subsidy, fertilizer subsidy, credit and input support can be processed with ease.
Digital proof you control. Registration needs your consent through e-Sign, so you know exactly what you are agreeing to share. This Transparency can prevent corruption.
Better planning for everyone. Accurate farmer and land data helps governments estimate production and plan support.
To provide subsidies. A farmer who buys fertilizer from the shop using the farmer ID can get fertilizer subsidies directly. Just imagine you purchase some fertilizer from a government-authorized shop; you have to ask the shopkeeper to enter your Farmer ID to get a subsidy; it actually acts as a coupon Code.
Eligibility Criteria
These are the common requirements:
- Ensure that you are a farmer in the state where you are registering.
- You need an Aadhaar number.
- Your Aadhaar should be linked to a mobile number (for OTP e-KYC), or you should use the biometric option.
- You should have land records in your name, for the owner flow shown in the official guide.
- Your land should be digitised in the state’s land record system.
If your state allows tenant or other farmer categories, rules will be given on your state portal or by the agriculture office.
Required Documents Checklist
- Aadhaar card number
- Mobile phone number you want to use for Farmer Registry updates
- Land details: district, taluka/tehsil, village, survey number and sub-survey number
- Copy of land record (RoR, 7/12, Khatauni or equivalent in your state) for reference
- Caste category information
- Identifier name (father, husband or other relation as per records)
- Email ID (optional)
- Family ID, if you want to link the Social Registry (optional)
How to Apply for Farmer ID: Step by Step
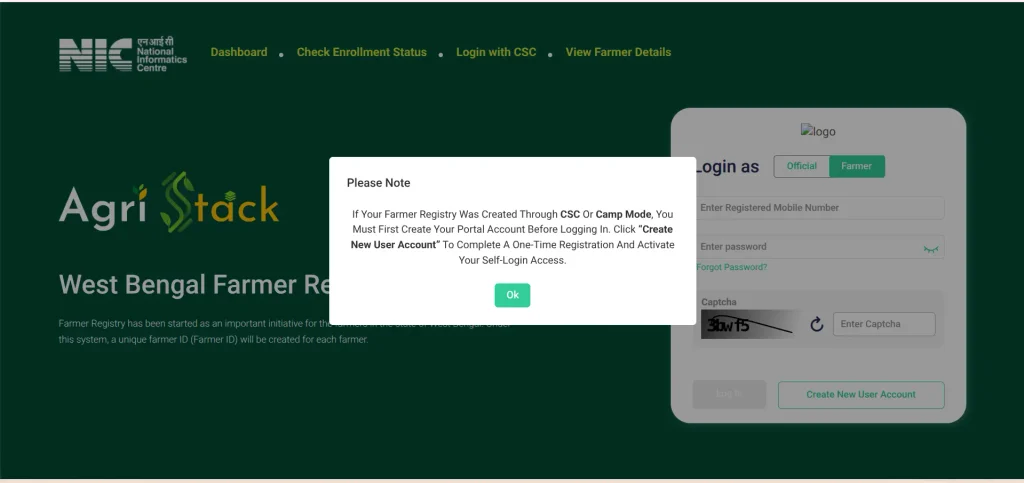
Visit your state Farmer Registry portal, then click on Login as a Farmer. After that, you have to create a new user account.
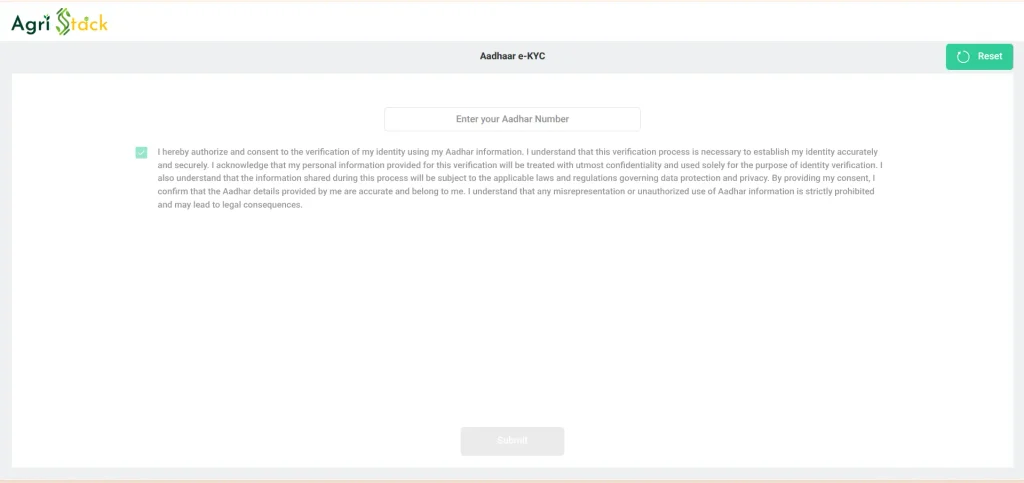
The first step is Aadhaar Authentication. Enter your Aadhaar number and click outside the field. An OTP will be received to tour register mobile number. Enter it and click Verify.
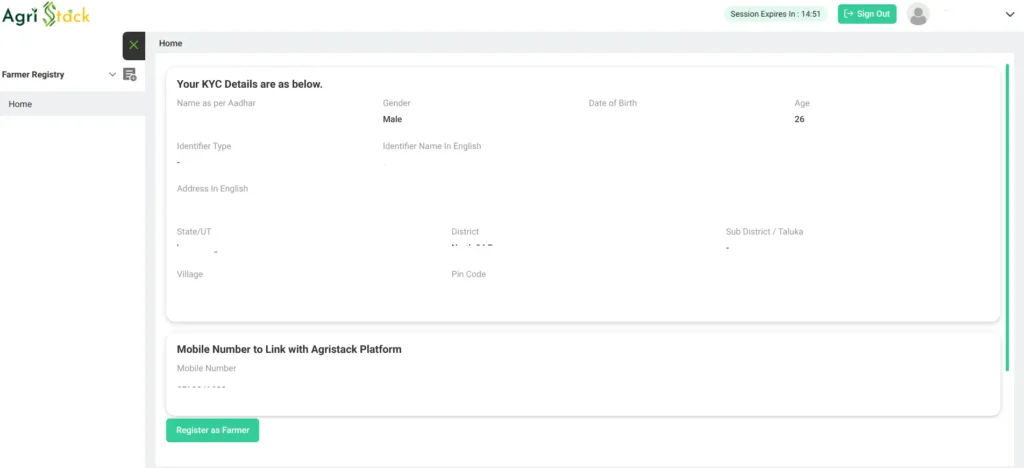
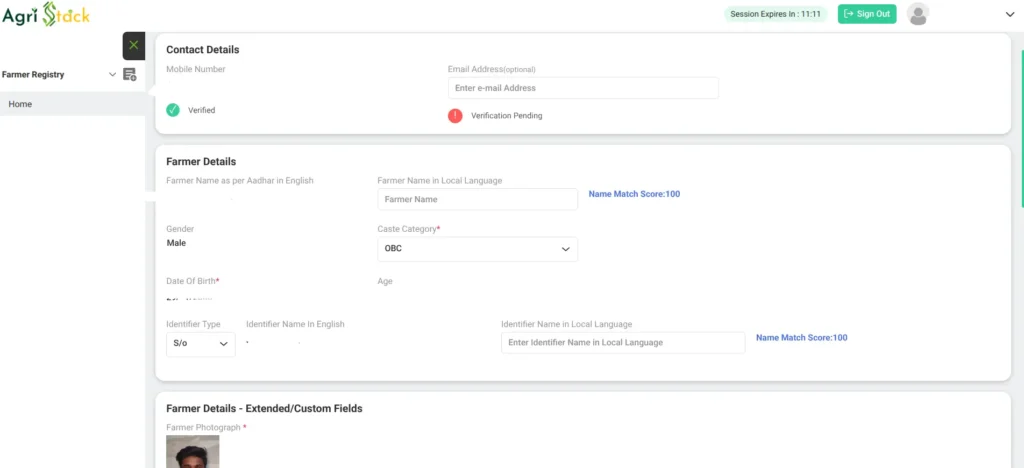
After the mobile number is verified, the system shows details fetched from Aadhaar, such as name, gender and date of birth. The operator must fill these mandatory fields:
- Caste Category (for example General, OBC, SC, ST)
- Identifier Type (such as father, husband or other relation as listed)
- Identifier Name (in English, and local language where asked)
Check spellings carefully. Small spelling differences can later affect land matching.
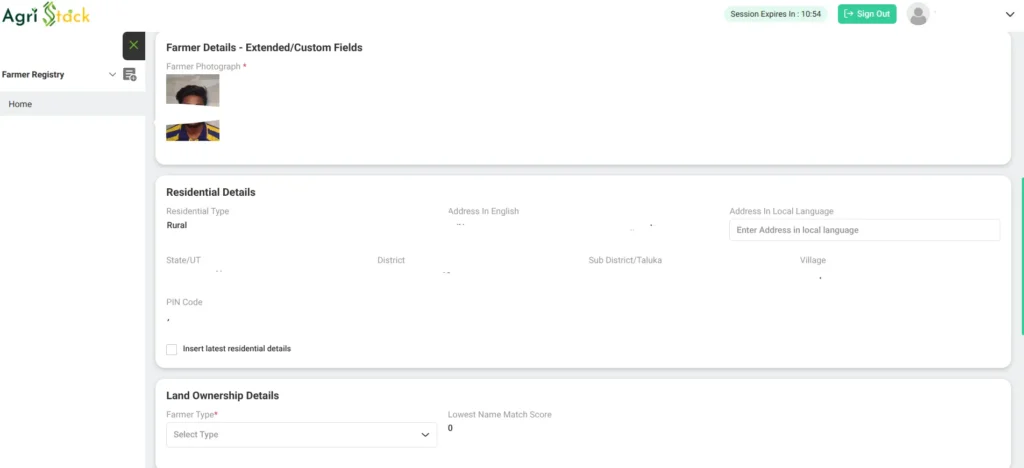
Residential details are also fetched from Aadhaar. If the farmer has moved, the operator can tick Insert Latest Residential Details and enter the current address. This is useful because the village you select matters for the next step, which is land.
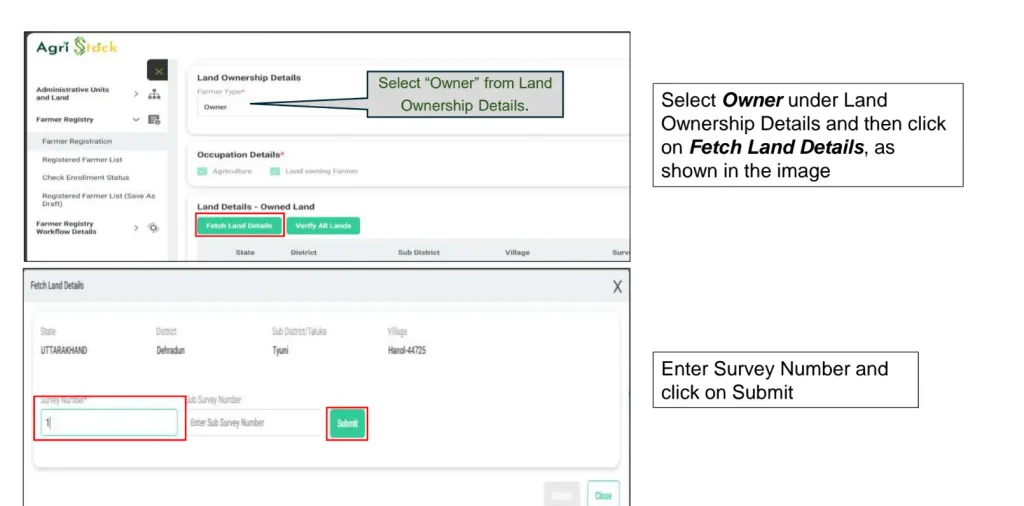
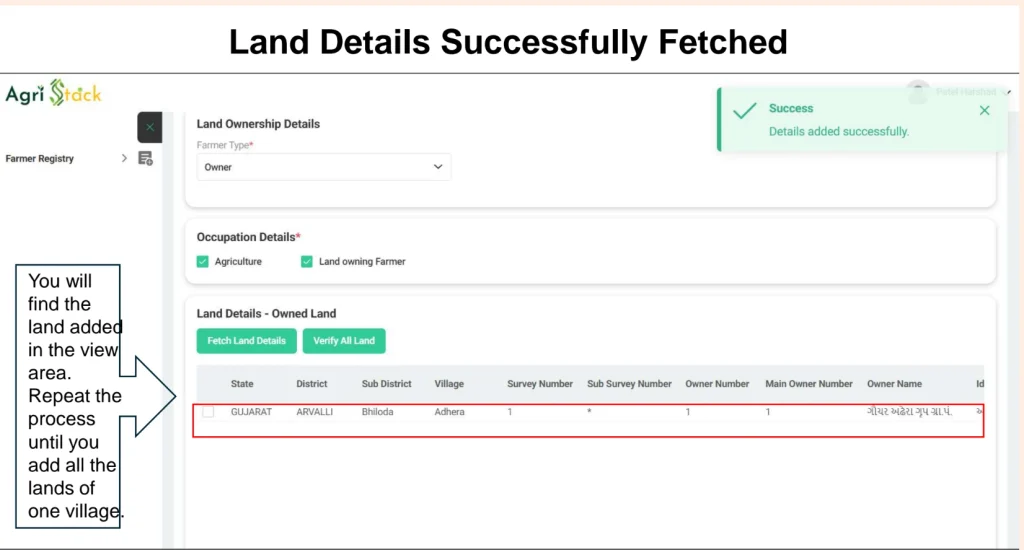
Under Land Ownership Details, the official guide shows selecting Owner as the farmer type, with Agriculture and Land-owning Farmer as occupation. Then the operator clicks Fetch Land Details.
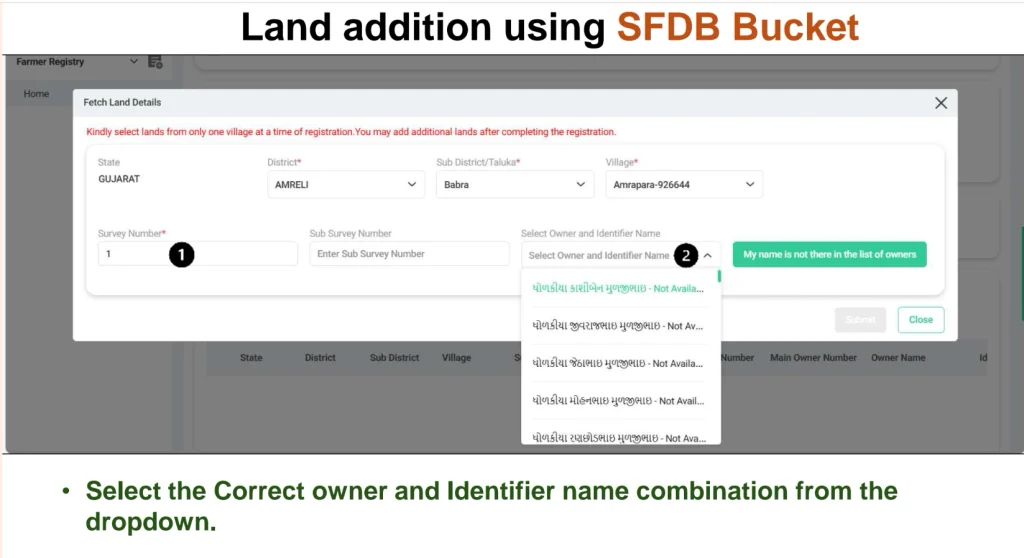
In this new window, choose the farm land type, enter the identifier type and identifier name, and click Add Land Details.
Repeat the process until all lands of that village are added.
Once every thing is added, the land appears in the Land Details table with a “Details added successfully” message.

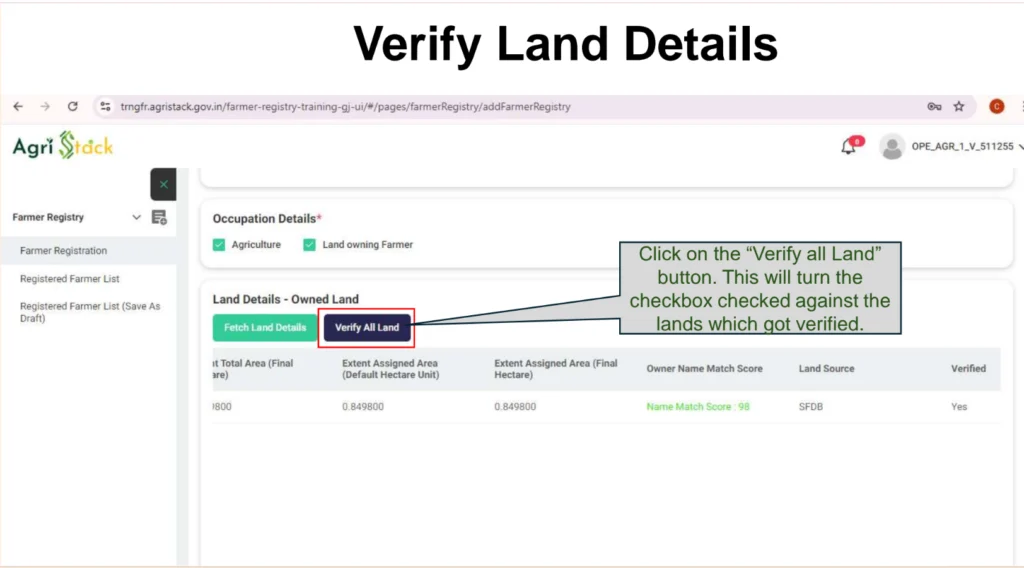
Click on Verify All Land. The checkbox turns on and the Verified column changes to Yes for lands that pass verification. After this, the portal shows the farmer category. For example, a farmer with less than one hectare is shown as a Marginal Farmer, along with total land owned and number of lands.
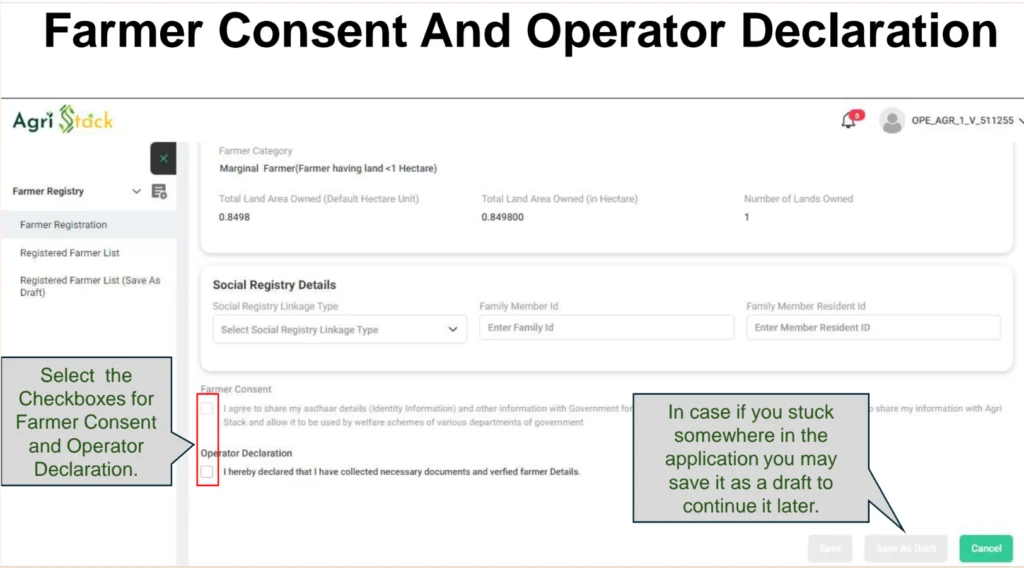
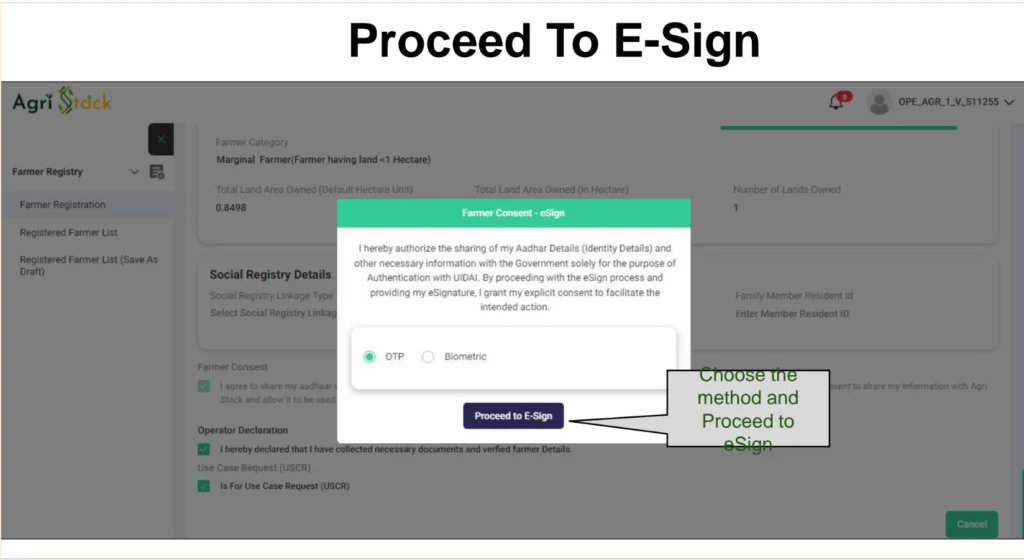
Farmer Consent –The farmer agrees to share Aadhaar identity information with the government for Aadhaar authentication and allows use for welfare schemes of government departments.
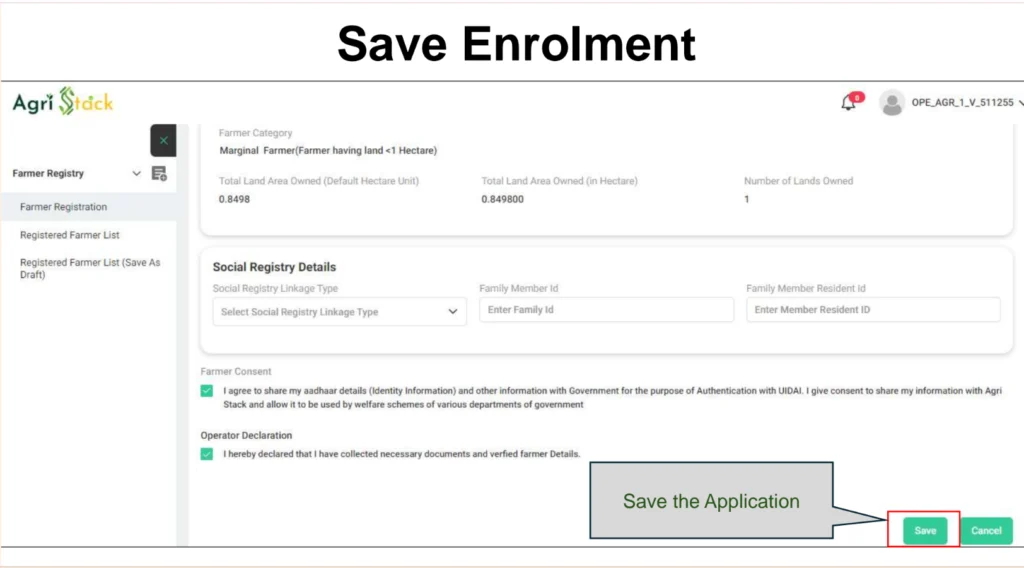
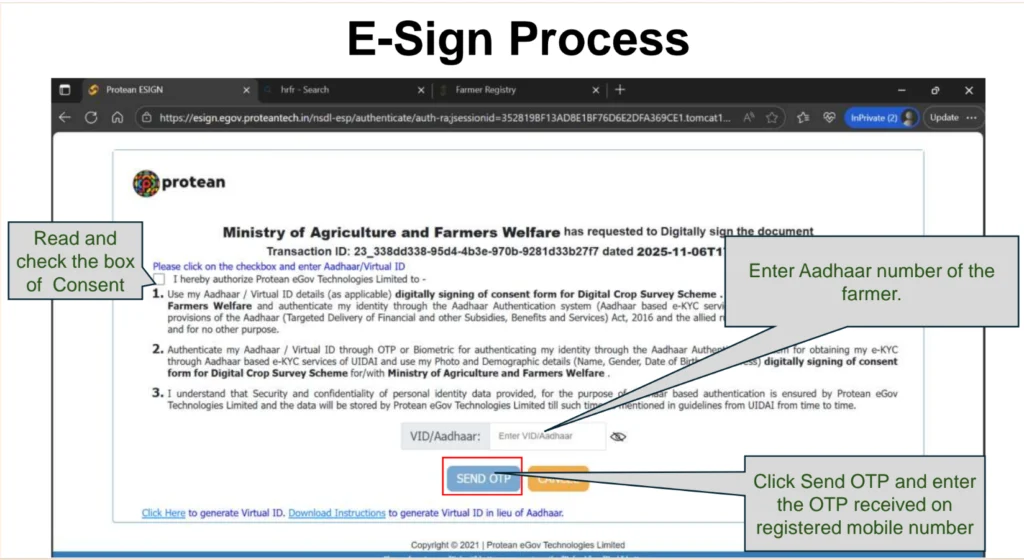
Click Save, then Proceed to e-Sign (OTP or biometric). The farmer is taken to the e-Sign page of the authorised provider, where the steps are:
- Read and tick the consent box.
- Enter the farmer’s Aadhaar or Virtual ID (VID).
- Click Send OTP and enter the OTP received on the registered mobile number.
The guide also shows a link to generate a Virtual ID if the farmer prefers not to use the Aadhaar number directly. Do not press Back or Refresh during e-Sign.
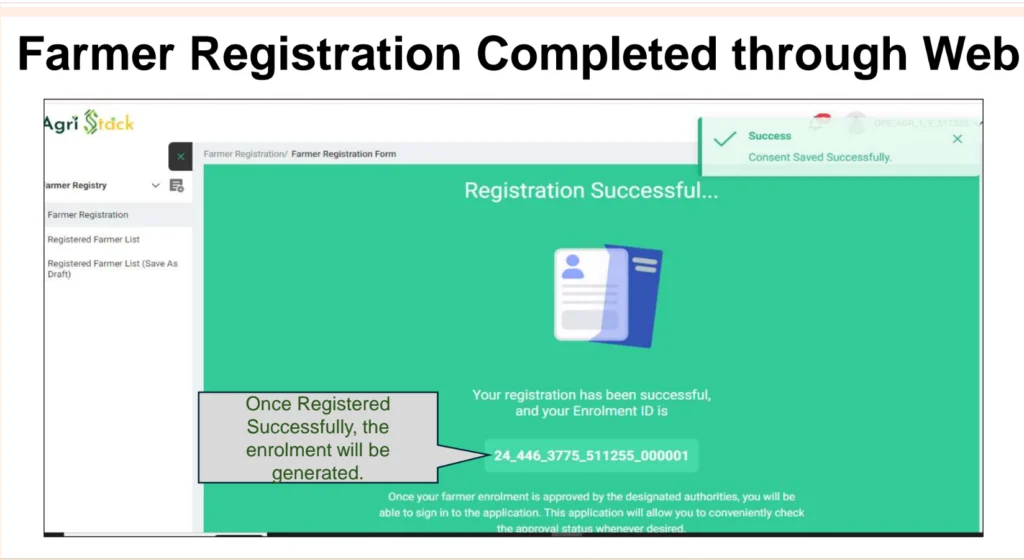
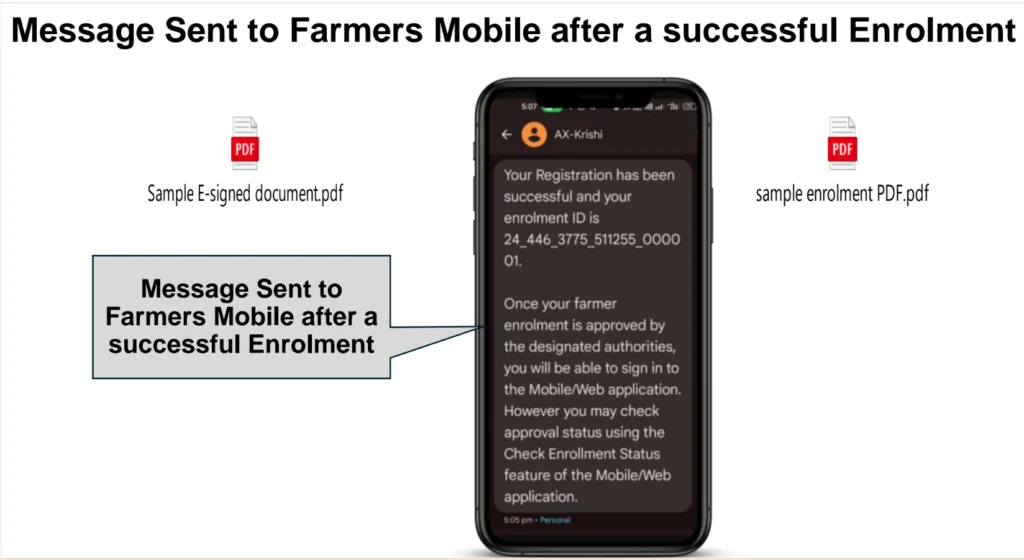
On success, the screen shows Registration Successful along with your Enrolment ID (a long code with underscores). The farmer also receives an SMS with the same ID. The message explains that once the designated authorities approve the enrolment, the farmer can sign in to the mobile or web app, and that approval status can be checked using Check Enrollment Status.
Mobile Application process
- Install and open the app.
- Log in with username, password, and captcha, then enter the OTP.
- Set a 4-digit MPIN (one time only).
- Choose Farmer Registration and complete Aadhaar e-KYC with OTP or other available options.
- Complete face authentication (follow the on-screen instructions and blink to capture the photo).
- Verify your mobile number with OTP, check and update details, select category and identifier.
- Select Owner and the two occupation options, add land using SFDB, and verify all lands.
- Give consent, complete face-based e-Sign, and submit.
Attaching a PDF for your reference.
Offline (Assisted) Application Process
Many of you do not have a smartphone, but the Farmer ID creation is important to you, so please follow these steps
- Visit a Common Service Centre (CSC), agriculture office, or a village registration camp.
- Carry your Aadhaar and keep your Aadhaar-linked phone with you for OTPs.
- The operator will enter your details and land information.
- Check everything on screen before agreeing.
- Complete e-Sign yourself using your own OTP.
- Collect or note your Enrolment ID.
The form is filled digitally, even in assisted mode.
State-wise Farmer ID registration links
| State | Online registration portal |
|---|---|
| Andhra Pradesh | Register Here |
| Assam | Register Here |
| Bihar | Register Here |
| Chhattisgarh | Register Here |
| Gujarat | Register Here |
| Haryana | Register Here |
| Himachal Pradesh | Register Here |
| Jharkhand | Check Portal |
| Karnataka | FRUITS Portal |
| Kerala | Register Here |
| Madhya Pradesh | Register Here |
| Maharashtra | Register Here |
| Odisha | Register Here |
| Punjab | Register Here |
| Rajasthan | Register Here |
| Tamil Nadu | Register Here |
| Telangana | Register Here |
| Tripura | Check Portal |
| Uttar Pradesh | Register Here |
| Uttarakhand | Register Here |
| West Bengal | Register Here |
Official Government Portal
National AgriStack Portal: https://agristack.gov.in/
Frequently Asked Questions (FAQ)
1. Who can apply for a Farmer ID?
Farmers who have land for farming to take necessary benefits from the government can apply for a Farmer ID.
2. Is there any application fee?
No registration fees. Do not pay agents or websites for a Farmer ID. If a CSC charges a service fee, ask for the official rate and a receipt.
3. How long does approval take?
It depends on the state and on how quickly the designated authorities verify the application. Some official explainers mention ID generation soon after verification, but timelines vary. Use Check Enrollment Status.
4. Can I apply offline?
Yes, in the sense of assisted registration. You can visit a CSC, agriculture office or camp, where an operator enters your details online.
5. What documents are mandatory?
Aadhaar with a linked mobile number and your land details (district, village, survey number) are the main requirements.
6. How can I check my status?
Use Check Enrollment Status on your state Farmer Registry portal or mobile app with your Enrollment ID.
7. What if my name is missing in the owner list?
The operator can click My name is not there in the list of owners and add land through the Unified Land API (RoR) method.
8. Can I add land from two villages?
Not at the same time. Select lands from one village during registration and add other lands afterwards.
9. What is the difference between Enrolment ID and Farmer ID?
The Enrolment ID is given after submission. The Farmer ID comes after approval.
10. Is e-Sign compulsory?
Yes. The farmer’s consent through e-Sign (OTP or biometric) is part of completing registration.
11. What if I get stuck in the middle?
Use Save As Draft and continue later from the draft list.
12. Can I change my address during registration?
Yes. Tick Insert Latest Residential Details and enter your current address.
Conclusion
Getting a Farmer ID is a simple process if you prepare well: Aadhaar e-KYC, a verified mobile number, correct land details, consent and e-Sign. The biggest problems come from name mismatches and outdated land records, so check those first.
You can also read